By Lynette Chen and Shirley Tay

It’s the most wonderful time of the year again when we start putting on our holiday playlists, decorating the Christmas tree and getting presents for your Secret Santees. But store-bought Christmas cards and gifts can get terribly overpriced, not to mention highly impersonal. But then again, how do you show your inner Santa without being an outer Scrooge?
UrbanWire presents 15 simple and inexpensive DIY ideas that will add a personal touch to your gifts and home – because that’s what a meaningful Christmas is all about.
DIY IDEA 1: CARDS
A Very Stringy Christmas Tree Card

(idea credits: Paige Russell)
For this simple yet unique card, rummage through your mother’s sewing kit for some loose thread and create your own Christmas tree on a card. It’s the best of both worlds a person can ask for – a tree and a card.
Time required
10 mins
Cost
$2.30
Materials needed
Plain card or paper
Green or red embroidery thread
Tape
A hole puncher
A ruler
Pencil
1 star cut-out/ star sticker (optional)
Steps

- Fold the card in half, and on the inside of the front cover, mark the midpoint of the top of the card. Make sure that the marking is about 3 to 5 cm away from the edge
- Along the bottom of the card, make 7 similar markings, all equally spaced apart
- Using a hole puncher, punch a semi-circle hole at the first marking you made at the top of the card. Make sure the mark is positioned above the centre of your hole puncher so that the positioning of the hole is accurate
- Punch semi-circle holes for the other 7 markings along the bottom of the card
- Paste a strip of double-sided tape directly below the hole you’ve made at the top of the card
- Tape down one end of the embroidery thread onto the double sided tape, with the end pointing downwards
- Loop the thread over the hole at the top such that the thread is now on the front of the card
- Loop the thread at the first hole on from the left along the bottom of the card, then loop it back over the hole at the top of the card. Keep checking to see that the second loop of thread adheres onto the tape you’ve stuck on the inside of the card
- Repeat step 8 for the remaining holes along the bottom of the card
- Finally, paste the star cut-out or sticker at the top of your thread christmas tree
Tip: Place the card on a flat surface as you’re looping the thread around it so as it make sure the thread isn’t pulled too taut.
Christmas Tree Pop Out Card

Forget any preconceived notions about pop-out cards being complicated. Just follow the steps and soon you will be a pro at making pop-out cards.
Time required
5 minutes
Cost
$2
Materials
2 pieces of paper (1 in green, 1 in a contrasting color)
Scissors
Pencil
Glue
Gold marker
Steps

- Fold the green paper into half and along the fold, draw half an outline of a Christmas tree as shown in the image above
- Cut along the solid lines
- Fold down each individual segment of the tree that you’ve cut along the dotted line. Press each segment firmly to make sure that the creases are defined. Flip the card over and repeat on the other side
- Open up the card and lay it out on a flat surface. With your thumbs, push up the cut-out segments to make them stand out
- Paste it onto the contrasting-colored paper
- Add some finishing touches with your golden marker and erase your pencil markings to complete
Button Up Christmas Card

(idea credits: Gurd Gifts)
How cute is the little snowman? All you need for this little treasure are a few buttons, pieces of felt and a little imagination.
Time required
5 minutes
Cost
$2
Materials
1 piece of brown paper
A strip of red felt
2 white buttons of different sizes
Glue
Golden marker for decoration (optional)
Steps

- Fold the strip of felt at a slight angle so that the shorter, folded section sticks out slightly
- Glue the longer section of the folded strip onto the card at an angle so that it forms a sideways ‘V’
- Glue the smaller button on top of the longer strip of red felt, overlapping about one-third

- Glue the larger button glue right below the smaller button on the strip of felt
- Glue the shorter strip of red felt over the buttons
- Add some finishing touches with a silver or gold marker
DIY IDEA 2: DÉCOR
Sugar, Gumdrops and Everything Nice Ornament

For all the candy lovers out there, this is for you. Feel free to go crazy on the number of gumdrops. No one’s going to blame you if you sneak a bite every now and then. It’s Christmas after all!
Time Required
30 minutes
Cost
$4
Materials
1 bottle of gumdrops / fruitdrops
1 box of toothpicks
1 Styrofoam ball
1 Paperclip
A piece of string/twine
Steps

- Straighten out a paperclip until you get a curved ‘V’ shape and poke the ends of the paperclip into the styrofoam ball, leaving about 1 to 2 cm exposed
- Tie a piece of twine or string to the paperclip
- Break the toothpicks into half
- Attach a gumdrop to the blunt end of the toothpick, and insert the sharp end into the styrofoam ball
- Repeat step 4 until the entire styrofoam ball is adequately covered
Frosty the Snowman Ornament

(idea credits: The Frugal Navy Wife)
Rather than using the same old ornaments on your Christmas tree, spice it up a lil with this snowman ornament. And once Christmas is over, you can even reuse it as a bookmark. How’s that for versatility?
Time Required
10 minutes
Cost
$2
Materials
1 ice-cream stick
1 piece of red felt
1 piece of black paper
1 piece of orange paper
3 assorted buttons
Black pen/marker
Twine/string
Glue
White paint
Steps

- Paint the icecream stick white and let it dry completely
- Cut the red felt into a rectangular shape of 2.5 cm width and 7.5 cm length
- Glue the felt onto the craft stick in the shape of a scarf (see Snowman Scarf)
- Cut a hat shape out of the black paper

- Cut a small triangle out of the orange paper for the nose
- Glue the hat, nose, and the assorted buttons onto the craft stick
- Draw on the eyes and smile of the snowman

- Glue a looped piece of twine/string onto the back to complete
Pom Pom Santa Ornament

(idea credits: Just Crafty Enough)
It’s hard to believe that Santa Claus can ever resemble a dwarf, but at least in UrbanWire’s interpretation, he truly does. With only 3 core materials needed, anyone can make mini Santas at home.
Time Required
10 minutes
Cost
$2
Materials
1 piece of red felt
1 piece of orange paper
White yarn
Glue
Fork
Steps

- Cut out a semicircle of 6 cm length out of the red felt for the hat
- Roll it into a cone shape and glue down the edge

- Cut out a small rectangular shape out of the orange paper for the nose
- Using about 2 m of white yarn, wrap it around the fork and secure tightly by tying it lengthwise and widthwise
- Remove the yarn from the fork and fluff the yarn, pulling it with your fingers

- Stuff the ball of white yarn into the cone hat and secure it with glue
- Dab a little glue onto the orange nose and secure it into the base of the cone hat
- Glue a piece of looped yarn onto the back of the tip of the cone to complete
Flowers for my Missus Wreath

(idea credits: A Beautiful Mess)
The history of wreaths stretch way back to Ancient Greece and Roman civilizations and in UrbanWire’s modern reincarnation of the traditional wreath, we go big on artificial flowers and –you’ll never guess it – ping pong balls. Hang it on your door for the arrival of Christmas and after the year’s over, you can even reuse it for perhaps a garden wedding.
Time Required
30 minutes
Cost
$14.78
Materials
Bunches of artificial flowers
1 wire ring (275mm would suffice)
White ping pong balls
Glue
Ribbon (optional)
Steps

- Secure the flowers onto the wire ring with twine
- Glue the ping pong balls onto the flowers, depending on where you want them
FESTIVE TOUCHES
For an added Christmas touch, twirl a ribbon of your choice around the exposed wire ring and secure with glue to complete
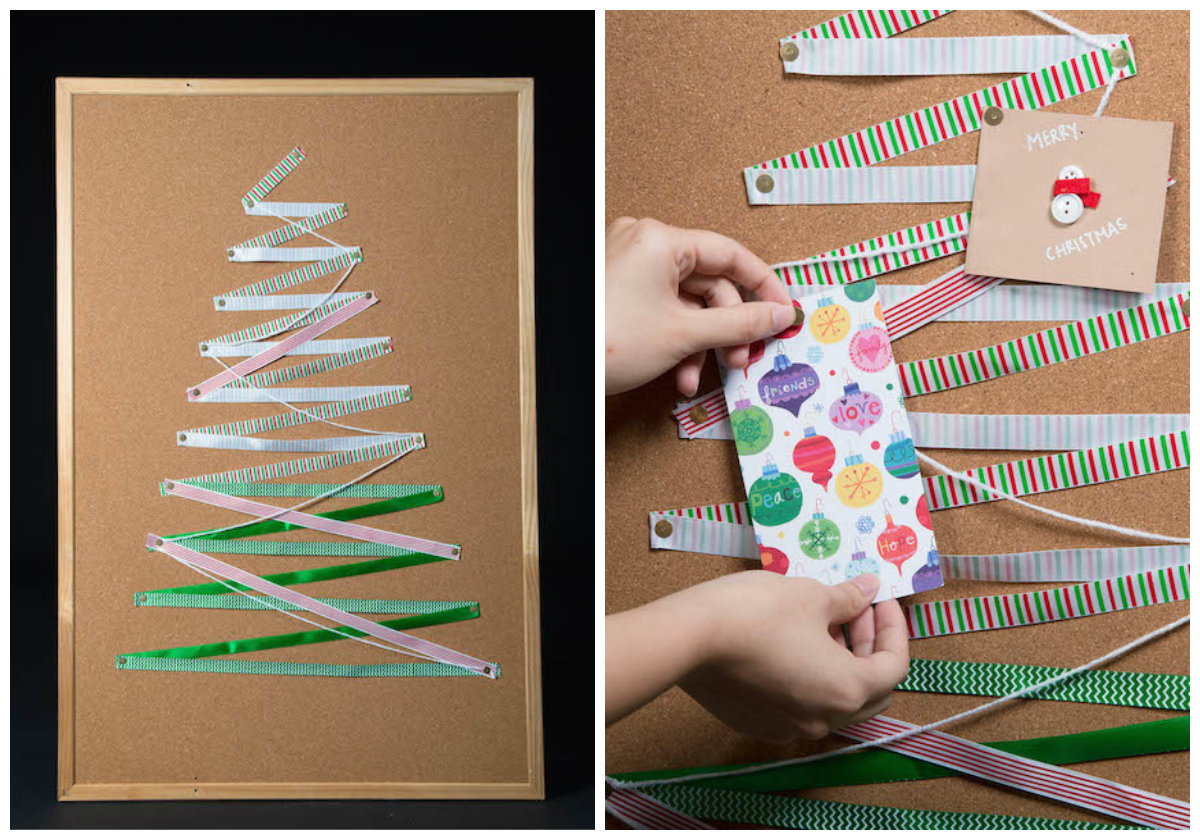
Pin up Christmas tree

If you fancy having a tree in your room, but simply can’t find the space for it, here’s UrbanWire’s solution for you – a ribbon tree on a cork board. Spruce up your room with this simple ‘tree’ and pin your favorite cards and photos on it.
Time Required
30 minutes
Cost
$12
Materials
Assorted ribbons
Cork board
Thumbtacks
Christmas cards
Yarn/string/twine/thread (optional)
Steps
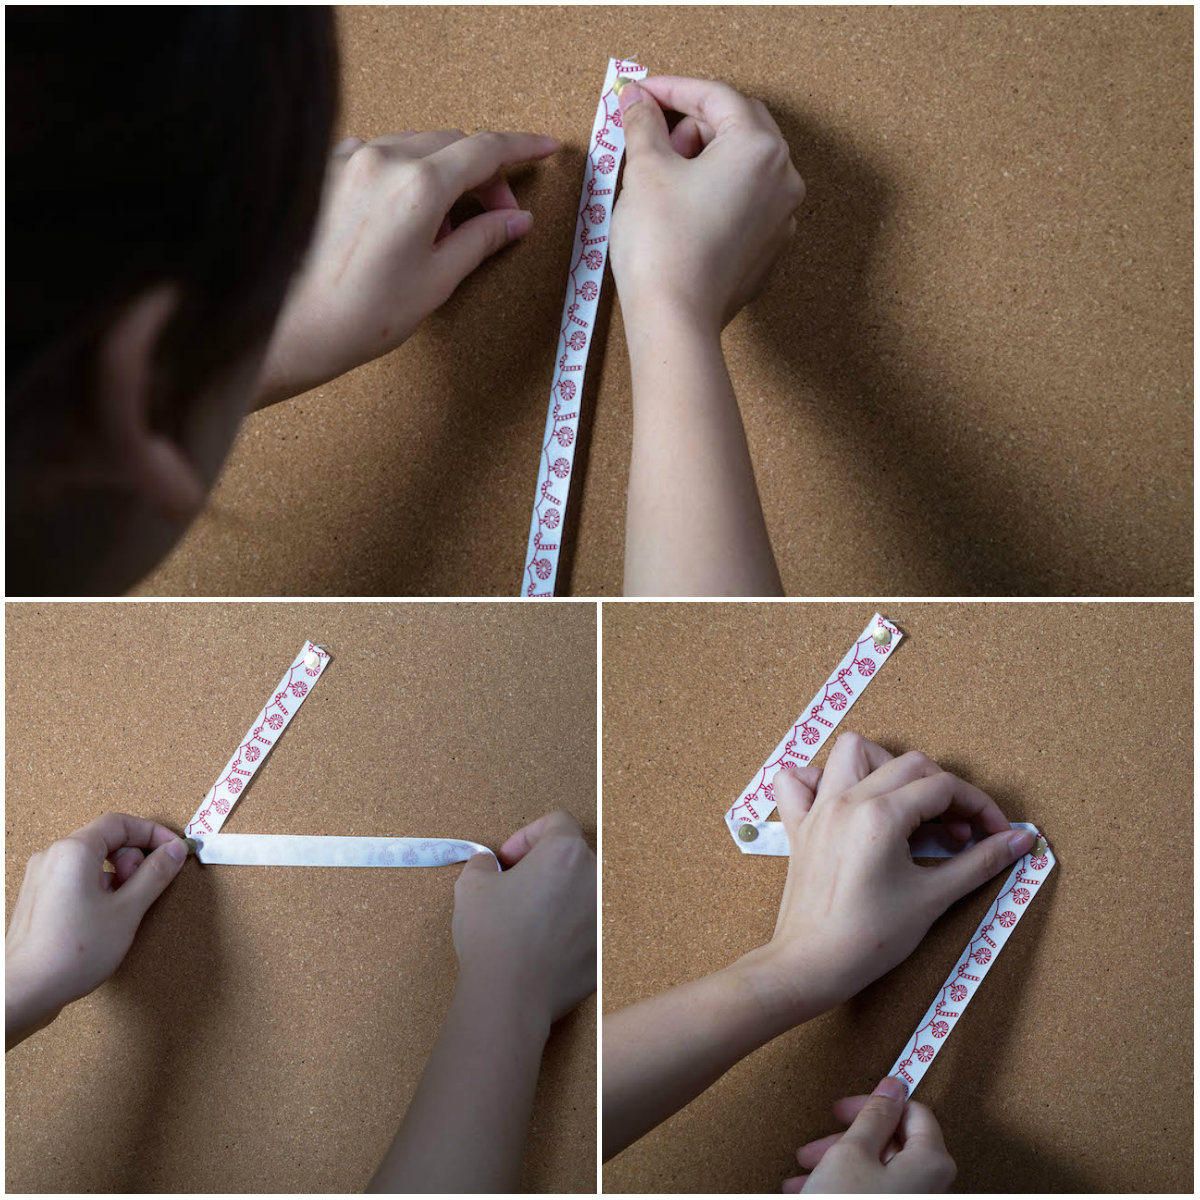
- Pin the ribbon onto the board with a thumbtack
- Fold the ribbon to form a straight line, then folding it again to form a slanted line as shown
- Pin in place
- Repeat steps b and c, increasing the length of the ribbons and width of the tree
- When you’ve reached the size of the tree you want, pin the end of the ribbon in place
- Pin the Christmas cards and other decorative items on parts of the tree
Tip: If you feel your board might look too empty, feel free to pin some ornaments or tags around the tree as well.
Stringed-Up Jolly Buntings

A room never seems put together without some decorations, and paper buntings are an easy and economical option. They are timeless, versatile, and you can also include your personal touch to it.
Time Required
30 minutes
Cost
$10
Materials
Assorted decorative papers
Twine
Glue
Scissors
Steps

- Fold down a 4 cm section of the square paper
- Measure 20 cm widthwise at the top of the folded section, and cut out a triangle
- Glue down the piece of twine in between the folded section and secure the edges of the paper with glue
- Repeat steps 1 to 3 for as many triangles as you wish, but leave 3 cm in between each triangle when arranging them on the twine
A Golden Christmas Cone

Alternatively, if you don’t wish to have a ‘tree-looking tree’ in your home, but still wish to have some semblance of Christmas, the Christmas Cone might just do the trick. Feel free to customize it to your liking and watch it brighten up your living space instantly.
Time required
10 minutes
Cost
$8
Materials
Heavy weight plain cream paper
A long brush
Pencil
Gold spray paint
Glue
Glitter (optional)
Steps

- Lay the paper diagonally on a flat surface
- Align the brush along the top left hand edge of the paper, holding down the top with your left hand. In your right hand, hold your pencil together with the end of the brush
- Move only your right hand across the paper so that your pencil marks a perfect curve on the paper
- Cut along the curve you’ve just drawn
- Glue the two ends together to form a cone
- To complete your cone, spray paint it and leave it to dry
FESTIVE TOUCHES
To add a festive sparkle, sprinkle gold or silver glitter on the paint while it’s still wet.
Instant Memories Wreath

(idea credits: Postalpix)
An extremely modern take on the traditional wreath would be the Instant Film Wreath. Decorate this piece with your favorite pictures of friends and family. This is a great spin on your photo album-slash-Christmas wreath!
Time Required
15 minutes
Cost
$10
Materials
Embroidery hoop
Ribbons
Glue
Scissors
Wooden pegs
Washi tapes
Steps

- Glue down one end of the ribbon to the hoop
- Wind the ribbon around the hoop and glue down the end
- Paste the washi tape onto the wooden peg and trim to fit
- Glue as many wooden pegs as you like onto the hoop
- Once the glue has dried, you can insert cards or instax films into the pegs
DIY IDEAS 3: GIFTS
XMAS Countdown Calendar, for the Christmas-crazed friend

We all have that one friend who’s nuts about Christmas – the girl (or guy) who unabashedly belts out Christmas carols in the middle of the day or starts toting a Santa hat in November. So what could be a more perfect gift for them than a Christmas countdown calendar?
Time required
5 minutes
Cost
$11
Materials
1 photo frame
1 piece of decorative paper
1 chalk board tag
1 gold marker
Twine
Glue
Steps

- Cut the decorative paper to the size of your photo frame
- Using your gold marker, write “Days to Christmas” on the decorative paper while leaving a space for the chalkboard tag in the top left hand corner
- Insert the decorative paper into the frame
- Paste the Chalkboard tag onto to the frame
- Thread the twine through the the hooks on the back of the frame to complete
Tip: Include some chalk in your gift so that your friend can countdown the number of days on the chalkboard tag
Neat and Gold Desk Organizer, for the friend who needs a little fixing-up

(idea credits: View From The Fridge)
Ever been completely horrified by the state of your friend’s desk? Here’s a pretty gift to help them bring a little organisation into their lives. What’s more, this is made with recycled materials found in your homes so this would be perfect for the environmentally conscious friends.
Time required
10 minutes (excluding drying)
Cost
$12
Materials
1 flat plank of wood
4 round biscuit and tidbit tins/containers of various heights
Gold spray paint
Glue
Newspapers
Steps

- Arrange the tins on the plank to your wish
- Once you’re satisfied with the arrangement, glue them onto the plank
- Lay out some newspaper to protect your floor, walls or desk from the paint
- Ensure the glue has dried completely before laying the plank onto the newspaper
- Spray paint the plank and tins. If you want an even coating of paint, hold the can at a distance of at least 20cm
- Leave the organizer to dry for 10 minutes or so
FESTIVE TOUCHES
Decorate your desk organiser with mini Christmas paper cones to give it a festive look
Sweet Sweet Bauble, for the friend with a sweet tooth

This simple and sweet (literally) Milo and Marshmallow ornament is guaranteed to melt even the most icy hearts this jolly season.
Time required
5 minutes
Cost
$7.90
Materials
1 glass ornament ball
2 packets of instant mix Milo
Marshmallows
Sprinkles
1 plain white mug
Golden marker for decorating (optional)
Candy cane (optional)
1 piece of paper/funnel
Satay stick (optional)
Steps

- Wash all parts and sides of the ornament thoroughly
- Using a paper cone as a funnel, pour the Milo powder into the ornament
- Using the same funnel, pour the sprinkles into the ornament. Keep adding the sprinkles until they are visible inside the ornament
- If the marshmallows are too large to fit through the mouth of the ornament, cut them into smaller pieces. Use a satay stick to push the marshmallows into the ornament
- You can include a mug for your friend to enjoy the contents of their Milo ornament in. You can decorate your own plain white mug, as seen in the photo above. Add a candy cane or chocolate spoon to complete
FESTIVE TOUCHES
For those looking for some added pizzazz, you can also add some red and green ribbons on the handle to make your mug look even more impressive.
Oh, Sugar, Sugar Scrub, for the skincare-obsessed friend

(idea credits: Mommy Musings)
Homemade sugar scrubs are a brilliant way to exfoliate your skin without stripping it of its natural moisture. With this inexpensive and organic scrub, you might just swear off store-bought products.
Time Required
10 minutes
Cost
$2
Materials
1 Jar (any size)
Sugar (according to size of jar)
1 tablespoon of Olive oil
Vanilla essential oil (or any other preferred essential oils)
A spoon
1 Container
Twine (optional)
Glue (optional)
Decorative label (optional)
Steps

- Measure the amount of sugar needed for the jar of choice and pour it into a container
- Mix in the olive oil
- Mix in a few drops of the essential oil and mix well
- Spoon the mixture into the jar and cap it tightly
Tip: To add a personal touch, tie a piece of twine around the mouth of the jar and paste a decorative label on it.
Hopefully this list has given you some inspiration to get started on your own DIY projects and now, go spread some handmade holiday cheer this Christmas season.
Materials can be bought from Artfriend, Daiso, Spotlight, Paper Market and Made With Love.
Photographs by Shermane Eng and Rajid Ahamed of Klix Photography