You’ve seen the newest issue of hype magazine and you’ve noticed it’s cover. Now let hype magazine’s designer, Teo Hong Jun, take you under the cover as he reveals the Photoshop magic behind hype‘s cover.
Thought that the lovely tattoos on the back of our cover model were real? Think again!
These intricate tattoos were actually digitally applied onto the model through the use of Adobe Photoshop. Sounds interesting? Wanna know how we did it?
Then dive into this behind-the-scenes tutorial as we show you step by step how you can achieve the same effect. Don’t forget to also check out the extra resources at the bottom for more tutorial goodness!
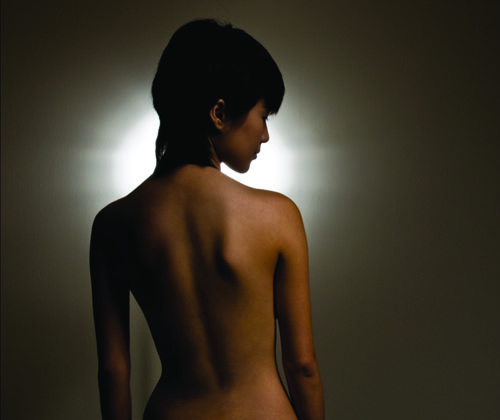
Before we start, make sure that you have a nice image to work with. You can either take a photo of your subject or go to free stock imaging websites like www.sxc.hu.
2) Getting the tattoo
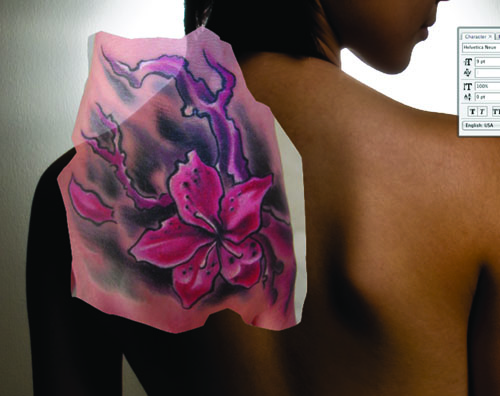
Look for appropriate images of tattoos for your subject. Using images of real tattoos
will give you a better result.
Place the picture of the tattoo on the body using Adobe Photoshop.
3) Masking
Now, create a layer mask and start removing the parts of the tattoo that fall out of the body area that you want to focus on.
Are you following so far? Good.
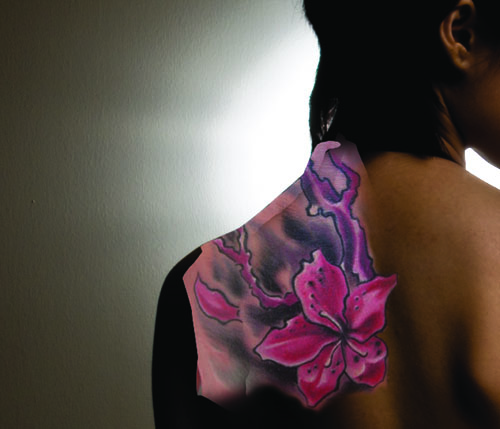
4) Brush settings

To easily mask out the unwanted parts, choose a softer brush by lowering the hardness of your brush settings. This will soften the edges of your masking, thus making the image look more realistic.
The entire process requires time, and how much time you need will depend on how skilled you are. This took 30 minutes for me.
5) Create magic

After you have completely masked out the unwanted parts of the tattoos, duplicate your tattoo layer. Change the layer-blend option of the first layer to Overlay and the second layer to Multiply or Soft Light.
The blend option used will be dependent on the intensity of your tattoo’s colour. Try to experiment with different options to get the best results possible. Also, adjusting the opacity will get you better effects.
6) Touching up
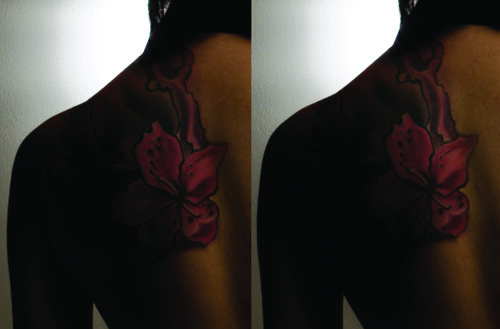
Now, touch up your tattoo by adjusting the lighting on the model. Either by using the Dodge or Burn tool, you can lighten or darken certain areas of the tattoo to achieve a good shadow effect. A brush with zero hardness gives the best result for this step.
Photos by Yeo Kai Wen.
Photoshop effects by Teo Hong Jun.
More Photoshop Resources
Additional reporting by Hoong Wei Long
Intrigued with what Adobe Photoshop can do? Wanna learn more tricks and techniques? Then check out the following useful links!
1) Smashing Magazine’s Handpicked Photoshop Tutorials
2) Smashing Magazine’s Best Of Photoshop Tutorials Selections
3) “Photoshop Tutorials” website